


 Following from the previous tutorial we now dive into move interesting and complex parts of JPA 2: Relationships! In this tutorial we'll be focusing on One-to-Many relationships (mainly Bidirectional), looking into their particularities (specially related to the Cascading of operations), we'll create a JUnit Test class for testing the Relationship, look at what actual SQL queries that are performed, learn by example and also some more interesting theory that is related to all of this. So, if at this point you haven't read the first tutorial on JPA 2, you might want to do it now. As always a few assumptions are made, like basic knowledge of SQL and relational databases, what an EJB is and where does it run, Unit Testing, an IDE is setup (like NetBeans) , a MySQL database is setup and basic knowledge on how to use it and , as stated before : All the things that were explained on the first JPA Tutorial: Getting Started with JPA 2 Tutorial
Also, the source code used for the demonstration later on this tutorial can be found here : http://sourceforge.net/projects/syshex/ . It is simply a NetBeans project with the basic classes that we'll modify later on the Tutorial to check stuff.
Right, lets get down to business. In a relational database tables can bear associations between each other, in JPA these associations are can be mapped onto the Entity Beans in order to represent the database schema. This is done by annotating reference attributes to other Entity Beans. There are 4 types of relationships :
- One to Many
- Many to One
- Many to Many
- One to One
Bidirectional and Unidirectional
These relationship types can be either Bidirectional or Unidirectional. The basic difference between Bidirectional and Unidirectional is that in a Bidirectional relationship, both Entities contain annotated reference attributes between each other and in a Unidirectional relationship only one of the Entity Beans references the other.
Owning Side
Any relationship has an owning side. This is what determines the updates to the relationship in a database. In the case of a Bidirectional relationship, one of the Entity Beans is always the owning side and the other side is called the inverse side. In a Unidirectional relationship, because only one of the Entity Beans in the relationship bears reference to the other, that Entity is the owning side of the relationship and there is no inverse. In One-to-Many and Many-to-One relationships, the Many part of the relationship is always the Owning side.
One To Many
So, for our example lets take two tables, one called Company and the other called Employee. The MySQL Workbench model file can be found with the sources of this tutorial, still it looks like this:
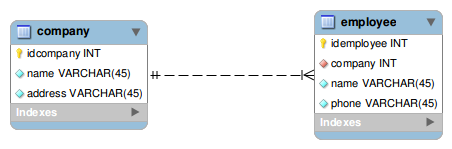
This is the SQL that generates this schema :
 CREATE  TABLE IF NOT EXISTS `jpatutorial2`.`company` (
   `idcompany` INT NOT NULL AUTO_INCREMENT ,
   `name` VARCHAR(45) NOT NULL ,
   `address` VARCHAR(45) NOT NULL ,
   PRIMARY KEY (`idcompany`) )
 ENGINE = InnoDB;

 CREATE  TABLE IF NOT EXISTS `jpatutorial2`.`employee` (
   `idemployee` INT NOT NULL AUTO_INCREMENT ,
   `company` INT NOT NULL ,
   `name` VARCHAR(45) NOT NULL ,
   `phone` VARCHAR(45) NOT NULL ,
   PRIMARY KEY (`idemployee`) ,
   INDEX `fk_employee_company` (`company` ASC) ,
   CONSTRAINT `fk_employee_company`
     FOREIGN KEY (`company` )
     REFERENCES `jpatutorial2`.`company` (`idcompany` )
     ON DELETE NO ACTION
     ON UPDATE NO ACTION)
 ENGINE = InnoDB;
Notice that in our little example the Foreign Key in the employee table is Not Null. So, because Employee is the Many part of this One-To-Many relationship, the EmployeeEntity class will be the owner of the relationship. This means that EmployeeEntity references only one CompanyEntity and that that reference field is annotated with the @ManyToOne annotation. The CompanyEntity class is the inverse of this One-To-Many relationship which means that it references many EmployeesEntities (a collection or list of EmployeeEntity), and that collection is annotated with the @OneToMany annotation. The following bit of code can be found on the EmployeeEntity class and exemplifies what has been said:
  @ManyToOne(optional = false)
  @JoinColumn(name = "company", referencedColumnName = "idcompany")
  private CompanyEntity company;
And this bit on the CompanyEntity class explains the inverse bit:
  @OneToMany(cascade = CascadeType.ALL, mappedBy = "company")
  private Collection<EmployeeEntity> employeeCollection;
These two bits of code make this a One-to-Many / Many-to-One bidirectional relationship because both sides of the relationship have references to the other side.
@ManyToOne
The ManyToOne annotation is used to define a single value association with another entity bean. Because the reference field is defined as a CompanyEntity object called company there is no need to specify further on this annotation which class type is the entity target, this is because it can be inferred. If this was not the case, as if for example the reference field was of type Object:
private Object company;
In this case the annotation element targetEntity should be used in order to let the Entity Manager know which type of object this Entity has a relation to:
@ManyToOne(optional = false, targetEntity=CompanyEntity.class)
Other more important and more regularly used elements of the ManyToOne annotation are both cascade, fetch, and optional. The optional element is used to indicate whether this reference can be null or not. The default value is true, and if it is defined as false then the relationship in the database schema must be defined as not-null. The fetch element is used to indicate how the Entity Manager should retrieve the referenced object of this relationship. The two possible values are FetchType.EAGER and FetchType.LAZY, with eager being the default. This element is of particular importance due to its usefulness when dealing with performance and small amounts of memory because it can avoid the initialization of unneeded large objects (imagine a relationship to an Object containing a large byte[] corresponding to a file), and avoid the extra database queries and data transference. It is usually used more on the OneToMany annotation due to the large amount of Object that can get created from retrieving the One side of the relationship. The cascade element of this annotation is used to specify the operations that must be cascaded to the elements of the association. The possible options are as defined in the CascadeTypeenum with the default being that no operations are cascaded by omition of the cascade element:
public enum CascadeType { ALL, PERSIST, MERGE, REMOVE, REFRESH, DETACH};
The Alloption means the combination of all the remaining options available. We will discuss more on this later on this tutorial. This element is also of particular importance on the OneToMany annotation because it will allow persistence of data from the inverse side of the relationship.
@JoinColumn
The @JoinColumnannotation is used to specify a column on the database table for the relationship. So, in our example, in the EmployeeEntity bean we got the following:
@JoinColumn(name = "company", referencedColumnName = "idcompany")
And in the SQL to generate the Employee table we got:
 INDEX `fk_employee_company` (`company` ASC) ,
   CONSTRAINT `fk_employee_company`
     FOREIGN KEY (`company` )
     REFERENCES `jpatutorial2`.`company` (`idcompany` )
     ON DELETE NO ACTION
     ON UPDATE NO ACTION)
The name element of the @JoinColumn annotation defines the name of the Foreign Key (FK) column. In this case, the name of the FK column is "company" as defined in the constraint.
The referencedColumnName element of the @JoinColumn annotation is used to define the column in the referenced table for the relationship, which is our case is "idcompany", which is the Primary Key (PK) of the referenced table. This means that it can be omitted here because the default value of referencedColumnName is the PK of the referenced table, which is discovered by looking at the table of the target Entity.
There are many other element options available for this annotation and one particularity about them is that they are all concerning the name element of the @JoinColumn. Other elements are nullable **(if the FK column is nullable) , insertable (if the FK column is to be insertable or generated), unique (if the FK column is unique, defaults to false, but it the FK column is the PK of the referenced table it is not necessary to set as true), table (the name of the table of the reference that contains the column), columnDefinition** (for generating the DLL of the column).
@OneToMany
On the CompanyEntity class we use the @OneToMany annotation in the following way:
 @OneToMany(cascade = CascadeType.ALL, mappedBy = "company")
 private Collection<EmployeeEntity> employeeCollection;
The @OneToMany annotation is used to define a multi-value association to a Collection of Entities. Because the relationship we are creating is bidirectional (because references exist on both sides of the relationship) the annotation element mappedBy MUST be used to specify the field that exists on the referenced entity which is the owner of the relationship.
The other possible annotation elements that can be used are cascade, fetch and targetEntity, which work exactly as explained for the ManyToOne annotation and the element orphanRemoval which is defaulted to false. The orphanRemoval functionality is intended for entities that are privately owned by the parent entity and will cause a remove operation to be propagated to those child entities without the need to use the cascade type remove to make it so.
Bear in mind that having this side of the relationship with the element cascade as ALL has several implications with the working of the code itself and the management of the entity beans. This will be shown in a bit.
And that is it! This is basically most of what is needed to know about a Bidirectional One-To-Many Relationship but for more details, specially with concerns about default behaviors and other not so common characteristics please do check the JPA 2 Spec (JSR-317) which is in the references at the end of this tutorial.
Obviously this wouldn't be complete without some testing and demonstration of the topics just discussed here! So lets jump right into that:
Seeing it working
So for starters, all the code for this project can be found at : http://sourceforge.net/projects/syshex/ . If you haven't download it yet, go there, download it (the distribution file should be called _ JPATutorial2-src-v.X.Y.zip_ or tar.bz2 or checkout the source from SVN) and open it with NetBeans (I use NetBeans 6.7 for this). Also, there should be a database configured on your test box, the Schema MySQL Workbench file can be found inside the distribution in a folder called model.
Apply the model to your database, open the NetBeans project and just dive right into the persistence.xml file. Add the following property line there:
 <property name="eclipselink.jdbc.driver" value="com.mysql.jdbc.Driver"/>
 <property name="eclipselink.jdbc.url" value="jdbc:mysql://localhost:3306/jpatutorial2"/>
 <property name="eclipselink.logging.level" value="FINE" />
 </properties>
This property will help us view what is actually being done at the database level. You could configure the database to log all SQL queries if you would like, I rather do it this way cause I'll also get verbose output from the Entity Manager that actually help solve loads of problems.
Also, adjust the remaining properties of the persistence.xml file to fit the MySQL configuration in use at your box.
Now go for the Test Packages and open the only JUnit file there: OneToManyTesting.java . This file has two tests configured in it but I'm not actually using any asserts there to validate the correctness of the Tests, but instead just looking to see if the operations return exceptions (a Fail) or if all operations on the method execute without exception. While on the IDE with this file focused, to execute the JUnit tests you should press Ctrl-F6 which should open the Test Results tab and the Output tab.
OK lets do it then, run the JUnit tests. Because we have just set the logging level to FINE the Output tab will be filled with logging stuff. So all went well hopefully.
Lets go ahead and delete testCreateCompany() test method (or just comment the @Test annotation) and run it again. The output of the log should show something like this (I trimmed a bit of the beginning of each line of the log) :
 // ------------------- FIRST BIT -------------------------
 Thread(Thread[main,5,main])--INSERT INTO jpatutorial2.company (address, name) VALUES (?, ?)        bind = [Av. 5 October, Lisbon, JBay Solutions]
 Thread(Thread[main,5,main])--SELECT LAST_INSERT_ID()
 Thread(Thread[main,5,main])--INSERT INTO jpatutorial2.employee (name, phone, company) VALUES (?, ?, ?)
         bind = [Rui Pereira, 23456789, 3]
 Thread(Thread[main,5,main])--SELECT LAST_INSERT_ID()
 // ------------------- SECOND BIT -------------------------
 Thread(Thread[main,5,main])--DELETE FROM jpatutorial2.employee WHERE (idemployee = ?)
         bind = [2]
 Thread(Thread[main,5,main])--DELETE FROM jpatutorial2.company WHERE (idcompany = ?)
         bind = [3]
In the code that we are using the first bit of the log corresponds to :
 em.persist(c);
 em.flush();
While the second bit of the log corresponds to :
 em.remove(c);
 em.getTransaction().commit();
Notice that in relation to the first bit of the log we just persisted one object, a CompanyEntity object that was new (check previous tutorial for Entity Lifecycle). There is another entity bean on the code, an EmployeeEntity object created but never persisted. The reason why in the first bit of logging, corresponding to the em.persist(c) statement, the two entities were persisted on the database is not magic, DOES NOT HAPPEN BY DEFAULT, and is in every way related the following:
both objects were made to reference each other (therefore creating a valid relationship).
and to the way these two Entities are annotated (cascading)
Creating a valid relationship
Concerning the first bullet point: both objects were made to reference each other (therefore creating a valid relationship) :
 // part 1
 e1.setCompany(c);
 // part 2
 c.getEmployeeCollection().add(e1);
So, in part one we set CompanyEntity c as the company of EmployeeEntity** e1**.
In part two we set a newly created Collection (a Vector) called a, which contains EmployeeEntity e1, as the Employee Collection of Company c.
One could ask: Is it necessary for both the Entity Objects to reference each other, could we not just make one reference the other and be done with it? Well.... you shouldn't. JPA 2 Spec states in page 42 the following:
Note that it is the application that bears responsibility for maintaining the consistency of run-time relationships- for example, for insuring that the “one” and the “many” sides of a bidirectional relationship are consistent with one another when the application updates the relationship at runtime.
Basically, the application should maintain consistency of run-time relationships, not the Entity Manager, and there is good reason for that: If only one side of the bidirectional relationship has a reference to the other side of the relationship then at run-time both Entities tell a different story about their relationship and ... the Entity Manager can't quite figure out what is it supposed to do: believe in one or the other Entity? Well, it believes the one that it is trying to persist which leads to the other entity to be inconsistent and require a refresh(). More on this later.
If for example we were to comment the following line :
//e1.setCompany(c);
The log would tell a different story altogether:
 Exception [EclipseLink-4002] (Eclipse Persistence Services - 2.3.0.v20110604-r9504): org.eclipse.persistence.exceptions.DatabaseException
 Internal Exception: com.mysql.jdbc.exceptions.jdbc4.MySQLIntegrityConstraintViolationException: Column 'company' cannot be null
 Error Code: 1048
 Call: INSERT INTO jpatutorial2.employee (name, phone, company) VALUES (?, ?, ?)
         bind = [Rui Pereira, 23456789, null]
So, exception because the field cannot be Null.
Now, if we leave e1.setCompany(c); uncommented (so, undo last change to the code) and now comment the following:
//c.getEmployeeCollection().add(e1);
And now execute the JUnit test what happens is that only the CompanyEntity c gets created. The Entity Manager em is called to persist c and has no knowledge of e1 being related (because it is only looking at c since it was the object that was requested to be persisted) and does not persist e1 and only persist c.
Now for the interesting bit: What about if we leave everything unchanged (so uncomment c.getEmployeeCollection().add(e1); ) and instead of persisting CompanyEntity c we go all creative and persist EmployeeEntity e1 instead? Well... that leads us to the second point stated above: the way these two Entities are annotated (cascading)
But first let us test it anyway by doing the following changes:
 //em.persist(c);
 em.persist(e1);
 em.flush();
When we run it we get :
 Testcase: testCreateCompanyWithEmployee(com.syshex.tutorials.jpa2.tut2.OneToManyTesting):        Caused an ERROR
 During synchronization a new object was found through a relationship that was not marked cascade PERSIST: com.syshex.tutorials.jpa2.tut2.entity.CompanyEntity@1c286e2.
An Error.
Relationship Cascading
So, as expected, the way the Entities were designed influences a lot of the behavior that we'll get when using them! This is of no surprise I expect. One particular detail of this relationship makes persisting c generate an automatic persistence of e1 and makes persisting e1 fail, that detail the way the Cascades were defined for each side of the relationship:
On the CompanyEntity class we apply CascadeType.ALL to the relationship :
 @OneToMany(cascade = CascadeType.ALL, mappedBy = "company")
 private Collection<EmployeeEntity employeeCollection;
On the EmployeeEntity class we do not define the type of cascade to apply and therefore we default to no cascading:
 @ManyToOne(optional = false)
 @JoinColumn(name = "company", referencedColumnName = "idcompany")
 private CompanyEntity company;
But to validate that our train of though is correct, let us modify the EmployeeEntity class and define, for example, the cascading as CascadeType.PERSIST just like so:
 @ManyToOne(optional = false, cascade=CascadeType.PERSIST)
 @JoinColumn(name = "company", referencedColumnName = "idcompany")
 private CompanyEntity company;
and now we execute again the JUnit test class. What we get is the persistence of both e1 and c on the database, just like expected:
 Thread(Thread[main,5,main])--INSERT INTO jpatutorial2.company (address, name) VALUES (?, ?)
         bind = [Av. 5 October, Lisbon, JBay Solutions]
 Thread(Thread[main,5,main])--SELECT LAST_INSERT_ID()
 Thread(Thread[main,5,main])--INSERT INTO jpatutorial2.employee (name, phone, company) VALUES (?, ?, ?)
         bind = [Rui Pereira, 23456789, 10]
 Thread(Thread[main,5,main])--SELECT LAST_INSERT_ID()
 Thread(Thread[main,5,main])--DELETE FROM jpatutorial2.employee WHERE (idemployee = ?)
         bind = [3]
 Thread(Thread[main,5,main])--DELETE FROM jpatutorial2.company WHERE (idcompany = ?)
         bind = [10]
Now lets get creative and if we set both sides of the relationship with CascadeType.ALL and now do the following :
 /* c.getEmployeeCollection().add(e1); */

 //em.persist(c);
 em.persist(e1);
 em.flush();
So, we only keep the e1.setCompany(c) association because it cannot be null and we persist now from the inverse. Basically we do not keep both sides of the relationship consistent. We execute and we get :
 Thread(Thread[main,5,main])--INSERT INTO jpatutorial2.company (address, name) VALUES (?, ?)
         bind = [Av. 5 October, Lisbon, JBay Solutions]
 Thread(Thread[main,5,main])--SELECT LAST_INSERT_ID()
 Thread(Thread[main,5,main])--INSERT INTO jpatutorial2.employee (name, phone, company) VALUES (?, ?, ?)
         bind = [Rui Pereira, 23456789, 16]
 Thread(Thread[main,5,main])--SELECT LAST_INSERT_ID()
 Thread(Thread[main,5,main])--DELETE FROM jpatutorial2.company WHERE (idcompany = ?)
         bind = [16]
 Thread(Thread[main,5,main])--SELECT 1
 Thread(Thread[main,5,main])--Exception [EclipseLink-4002] (Eclipse Persistence Services - 2.3.0.v20110604-r9504): org.eclipse.persistence.exceptions.DatabaseException
 Internal Exception: com.mysql.jdbc.exceptions.jdbc4.MySQLIntegrityConstraintViolationException: Cannot delete or update a parent row: a foreign key constraint fails (`jpatutorial2/employee`, CONSTRAINT `fk_employee_company` FOREIGN KEY (`company`) REFERENCES `company` (`idcompany`) ON DELETE NO ACTION ON UPDATE NO ACTION)
 Error Code: 1451
 Call: DELETE FROM jpatutorial2.company WHERE (idcompany = ?)
         bind = [16]
 Query: DeleteObjectQuery(com.syshex.tutorials.jpa2.tut2.entity.CompanyEntity@3f96ee)
What happens is: both entries get inserted on the database but now CompanyEntity c is detached and outdated and requires being refreshed so that em.remove(c) can be executed:
 //em.persist(c);
 em.persist(e1);
 em.flush();
 em.refresh(c);
By refreshing the Entity object and making it managed it can now be used on the Entity Manager and the logs produce no errors.
Hope this shared some light on how things work underneath all the code of the One-To-Many/Many-To-One relationships and helps anyone.